My most recent exploration of the tabletop gaming universe is an age-old but timeless classic: Dungeons and Dragons (5th edition). I was always hesitant to dive in because I had heard about how complicated it was, and I thought that D&D was only for a select few eccentric enthusiasts who had nothing but time and Mountain Dew on their hands. This may not be an inaccurate statement, but I have found D&D to be quite enjoyable for any casual gamer or fan of the fantasy genre. If you have a competent person explain it to you, it should be relatively easy to understand. I did not have a relatively competent person explain it to me; instead I obtained the Starter Set and read the rules, feeling myself sink further and further into a rabbit hole of minutiae and insane detail, until, emerging on the other side, I reflected that perhaps it was not so intimidating after all. Yes, the weight of a hammer is listed (3 lbs for anyone who cares) and the price of a loaf of bread is detailed (2 copper pieces), but this does not mean that you must count every scrap of food and weigh every piece of equipment. You certainly can, if you wish, but you must not feel like you are bound to do anything. Wizards of the Coast (WOTC) seems particularly vehement that you make the game your own, discard what you do not like, and focus on what you do. I personally enjoy the level of detail that D&D permits, but there is no obligation. There are many different ways to play, as rather extensive research has shown me - for instance, you have a choice between theater of the mind (TOTM) or maps and minis (M&M) and of course it helps that they all have handy little acronyms. Or a combination of the two. Do you want your adventure to take place solely in your collective imagination, a picture painted in your brain by the deft strokes of your DM's brush? Or would you prefer to see your heroes represented in three-dimensional splendor upon a grid or battlefield of your choosing? I have found that a compromise between these two is the most efficient and satisfying. There is absolutely no point or good reason, as far as I am concerned, to move minis around a table with each action that you as the role-player take. No-one's tabletop can possibly support the diversity of setting, terrain, building, and scope that an average D&D adventure requires, and in this case I would much prefer to skip the hassle of sliding a mini around a table constantly, and just keep all the action in my head, where there are no real life images to distort my idea of what it all looks like. But then, conceding to the M&M argument, I use a simple grid map (30mm squares) and miniatures whenever combat takes place. This is because Actions really only have any bearing during combat, in which a character's turn is comprised of 6 seconds (according to the book) and every movement is important and must be calculated accordingly. Thus, to keep track of the character's location in relation to each other and the enemies, to determine line of sight, range, etc., it is almost mandatory to have some sort of visual representation, or else each player will envision a different scene in his head. Or the DM could take an hour to explain: "The wraith is exactly thirteen and a half feet from the ogre, who is standing 4 feet from the north wall and 6 feet from the west wall..." I think this balance between TOTM and M&M works out very satisfactorily. Then there is the level of minutia that you wish to delve into (i.e., weighing a character's equipment and checking his/her carrying capacity), and the choice of an emphasis on roleplaying and character interactions, or action and adventure. The two are of course no mutually exclusive, but every game will focus on one more than the other.
In summary, I would recommend D&D to anyone who has been sitting on the fence. The Starter Set is very affordable, at a $20 list price. It's a pretty harmless way of dipping your toe in, and comes with everything you need to get started. Alternatively, you could just jump right in armed with a couple dice cobbled together from different games, or even just a dice app on your phone, and some PDFs printed from the official D&D website. Yes, that's right, you can everything you need for free. The basic rules are there, all you need to do is start playing. And here are a few links to websites that I found to be very helpful when starting:
Dungeons and Dragons website
DM's Guild - contains a phenomenal selection of adventures, supplements, reference sheets, and homebrew content created for fans by fans.
Orc Pub 2.0 - this site has a good character builder, among other things
D&D5e Wiki
D&D Wiki - tons of homebrew stuff as well as official rules
Saturday, January 13, 2018
Tuesday, March 7, 2017
Developments on the SoBH Front
I recently purchased the newly revised and updated version of the SoBH game system: Advanced Song of Blades and Heroes. The rules are fundamentally the same with a few revisions here and there that have all been, in my experience so far, beneficial and fun. The biggest difference is the addition of reactions: when a player rolls one failure on an activation roll, his or her opponent gets to re-roll that one dice to attempt to activate one of his/her own figures. This keeps the pace much more interesting and allows for more smooth back-and-forth action. The rulebook itself is nicely designed and illustrated, clears up certain areas of the rules that seemed vague before, and has includes more character profiles. There are also new special abilities listed. The creators have also developed an entire fantasy world complete with its own map and brief history, if you enjoy fantasy worlds. Which I do. Immensely. If you liked the first version of SoBH this is definitely worth a look.
To go with my new rulebook I've also been busy painting some more figures and making terrain. I finished the Ogre Warchief a while ago:


 I also bought beautiful new dice from Chessex. They just make each roll that much more awesome.

 A farmhouse that I made a while back.

To go with my new rulebook I've also been busy painting some more figures and making terrain. I finished the Ogre Warchief a while ago:


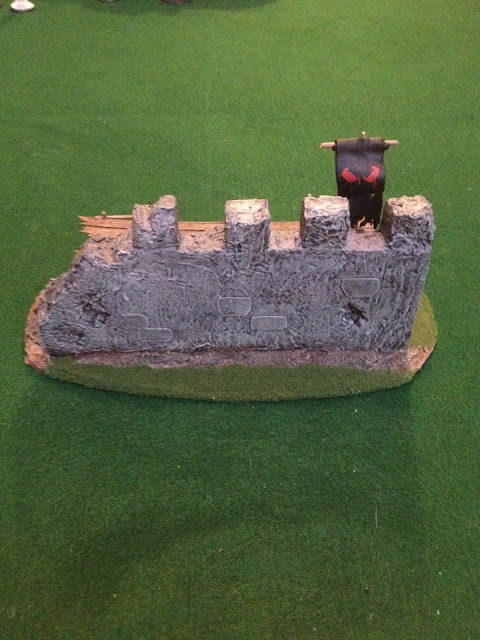
I also built a ruined orc wall as an obstacle for SoBH games. As you can see below I used regular Styrofoam for the bulk of the wall, then covered the whole thing in joint compound. The walkway thingy was a piece of thick corrugated cardboard with strips of thin cardboard from a cereal box glued onto that to create the appearance of individual wooden boards. I smeared some joint compound over it after it was dry and scattered some sand around, then drybrushed it to make it look old and weather beaten.

The tattered orc banner and the skulls are made of clay which I baked then painted.


Saturday, October 22, 2016
SoBH Human Warrior Personality
Finally got my paints out again. This time it was for another 28mm Reaper Bones mini, who they call Valeros the Iconic Male Human Fighter or something. I call him Ewan McGregor, for no better reason than that he has bright red hair and muttonchops and looks Scottish and Ewan McGregor is a good Scottish name. Any resemblance to actual persons, living or dead, is entirely coincidental, etc etc.
He has a cool pose and undeniably cool facial hair, but other than that is not particularly exciting. No crazy fantasy acoutrements or anything, just two good old fashioned swords and a bow, which for the purposes of SoBH does not exist. He has no ranged capabilities according to me. However I did give him the Dashing trait to make him a little more fun to play with. And he is one of the two personalities on my current Good warband. I will post both my Good and Evil warband profiles on my wargame rules page if anyone is interested. I used the super handy warband builder on ganeshagames.net that can be found here.
The photos for some reason make him look far more yellowish than he actually is.


Thursday, March 24, 2016
First Element of Marian Roman Army (Finally!)
So, after a long hiatus from figure painting, I am back. And first up on the list of crap to get done: start my DBA Marian Roman Army (II/49) so I can finally get my armies on the table and start playing some ancient warfare. Well actually, the first thing on my list was that second Gallic chariot, just to finish that army up, but I wasn't in the mood, so....
The figures are from the excellent Zvezda Republican Roman Infantry set (8034). The poses are good, beautiful details, almost no flash, and it has a perfect mix of triarii (heavy infantry) and velites (light infantry) so that you can make all the elements needed for your DBA army. I use those terms loosely, since under Gaius Marius the different classes of soldiers were abandoned. Here's the element list (or at least the one that I chose to use):
1x3Cv or 4Bd (Gen), 1x3Cv or 2LH, 8x4Bd, 1x3/4Ax or 2Ps, 1x2Ps.
My customized list is going to include a blade command element, both the cavalry and the light horse element (so that the player can choose which to use) and 2 psiloi elements instead of having to go to the trouble of buying a pack of auxiliaries.


Saturday, July 25, 2015
Irongrave Knight
I haven't posted for a while, and that's because I haven't painted anything for a while. I've been busy with summer. But here's my latest off the worktable: another 28mm Reaper Bones figure.
They call this dude Norgol, but he just doesn't look like a Norgol to me. So he'll just be an Irongrave Knight, for now.
He didn't take long to paint up; most of him is his armor, a monotonous dull metallic black. And I did not highlight extensively, because I wanted to give him a dark, brooding look. So mostly shadows on this guy, no bright colors or highlights.


Tuesday, June 9, 2015
Mason Thornwarden 28mm
Here's my latest 28mm Reaper figure: Mason Thornwarden. Or, for those of you who have read the trashy young adult series Ranger's Apprentice, Halt.
He was really easy to paint; there was virtually no detailing, just a bunch of highlighting and shading on the different materials of his clothing. But despite the lack of detail, I think he's a pretty cool looking figure.


He was really easy to paint; there was virtually no detailing, just a bunch of highlighting and shading on the different materials of his clothing. But despite the lack of detail, I think he's a pretty cool looking figure.


Monday, June 1, 2015
An Orc and a Dwarf
I have finally taken the plunge - the descent into madness. I have crossed the threshold from wargaming into Wargaming: I have painted my first 28mm fantasy figures.
They are the Orc Berserker and Dain Deepaxe from the Reaper Bones line, which I chose mainly because of their cheapness (the average figure on Reaper Mini is about $3, as compared to maybe $10 or more for a small Scibor or GW figure) and their appearance: though plastic, they still have that slightly whimsical trashy-fantasy air about them. And there's plenty of variety, too: everything from dwarves to orcs to elves to ogres to rogues to demons to dragons to werewolves. So you got choices.
Anyway, I'm really happy with them, and would recommend Bones figures to anyone who, like me, is new to 28mm gaming (that's pretty much the purpose of the Bones line - they're for newbs) or for anyone looking for a line of cheap minis that can fill up a wargaming table fast.
Reaper claims that you can paint Bones minis straight out of the box - meaning no washing, primer, or anything - but just to be on the safe side I treated these figures normally and washed them in soapy water and primed them. Also, both figures came with slight deformities - the orc had a bent sword and the dwarf was leaning forward on his base. If you find your Bones minis bent, fear not: there is a simple solution. Boil them.
Bring water to a boil and throw your figure in (I turned the water down to a simmer first, but I don't think you have to) or hold it in with tweezers for about 1 minute, then remove the figure and immediately bend it into the correct position. Then put the mini in some icewater for one or two minutes, and boom. Your crippled figure has miraculously been made whole. (For more details on preparing Bones minis, see this page on the Reaper site).
On to the painting. I did a lot of research on painting 28mm figures, because, of course, you use different painting techniques for larger figures. There are a bunch of different techniques, and after experimenting with a few on these two figures, I think I have my preferred method. Actually, this method consists of several different techniques, used on different parts of the figure. Here's a rough tutorial.
Start with chain mail, if there is any. This is because you're going to drybrush it, and drybrushing is clumsy and can get paint on unwanted areas, so that's why you start with it. Paint the chain mail black and then drybrush in silver or another metallic color. Easy.
Now move onto the skin. On skin, as on certain other areas, I use the three-tone method as described in my earlier post on painting crusaders. You'll use three shades of each color: a shade (or shadow) color, a base color, and a highlight color. Paint the skin in the shade color first; for my dwarf I used a tan/flesh combo, and for my orc I used a dark olive green. Then paint everything but the crevices and recesses in the base color, and finish with a highlight color on just the areas exposed to the most light. This will create a nice smooth blending transition between light and dark, as long as the discrepancy between your three colors is not too great. You will use this three-tone method on all skin, leather, cloth, and certain other items. (A quick tip: do the eyes (if you want to do them at all) after the shade color and before the base color, so if you screw up you can fix it with the base color.)
For my orc's abdominal armor plates I used the NMM (Non-Metallic Metal) method, then cheated by drybrushing in a metallic paint. The NMM method consists of the normal three-tone technique, but sometimes slightly modified to use more colors. For instance, for bright silver metal, you'll use black folloewd by dark grey followed by light gray followed by really light gray followed by white. But for my orc's armor, since it's supposed to be tarnished and rough, I just used black, dark gray, and light gray, followed by a drybrush of metallic gray to give it a more weathered appearance.
The orc's sword was done using a similar method; I gave it a base coat of black, then drybrushed it in dark gray and finallly drybrushed it in metallic silver.
Washes and filters are also very useful, and I used them quite extensively. (BTW, a wash is very diluted paint that brings out shadows; a filter is less diluted paint that is meant to change the overall color of the surface area). You have to kind of use your discretion for these; for instance, for the orc's leather arm thingies I applied a filter of dark brown over the base coat, then highlighted in light brown. One note: for my washes and filters I use Liquitex Matte varnish/thinner as a thinner instead of water; water washes leave dirty-looking rings in the wrong places and doesn't cover as well. My Liquitex works much better, covering evenly and smoothly.
As for basing, I used a 30mm base for the dwarf and a 40mm base for the orc.
So all this might sound time consuming and tedious, but it's actually quicker then you might think. Each of these figures only took me only about two painting sessions.


They are the Orc Berserker and Dain Deepaxe from the Reaper Bones line, which I chose mainly because of their cheapness (the average figure on Reaper Mini is about $3, as compared to maybe $10 or more for a small Scibor or GW figure) and their appearance: though plastic, they still have that slightly whimsical trashy-fantasy air about them. And there's plenty of variety, too: everything from dwarves to orcs to elves to ogres to rogues to demons to dragons to werewolves. So you got choices.
Reaper claims that you can paint Bones minis straight out of the box - meaning no washing, primer, or anything - but just to be on the safe side I treated these figures normally and washed them in soapy water and primed them. Also, both figures came with slight deformities - the orc had a bent sword and the dwarf was leaning forward on his base. If you find your Bones minis bent, fear not: there is a simple solution. Boil them.
Bring water to a boil and throw your figure in (I turned the water down to a simmer first, but I don't think you have to) or hold it in with tweezers for about 1 minute, then remove the figure and immediately bend it into the correct position. Then put the mini in some icewater for one or two minutes, and boom. Your crippled figure has miraculously been made whole. (For more details on preparing Bones minis, see this page on the Reaper site).
On to the painting. I did a lot of research on painting 28mm figures, because, of course, you use different painting techniques for larger figures. There are a bunch of different techniques, and after experimenting with a few on these two figures, I think I have my preferred method. Actually, this method consists of several different techniques, used on different parts of the figure. Here's a rough tutorial.
Start with chain mail, if there is any. This is because you're going to drybrush it, and drybrushing is clumsy and can get paint on unwanted areas, so that's why you start with it. Paint the chain mail black and then drybrush in silver or another metallic color. Easy.
Now move onto the skin. On skin, as on certain other areas, I use the three-tone method as described in my earlier post on painting crusaders. You'll use three shades of each color: a shade (or shadow) color, a base color, and a highlight color. Paint the skin in the shade color first; for my dwarf I used a tan/flesh combo, and for my orc I used a dark olive green. Then paint everything but the crevices and recesses in the base color, and finish with a highlight color on just the areas exposed to the most light. This will create a nice smooth blending transition between light and dark, as long as the discrepancy between your three colors is not too great. You will use this three-tone method on all skin, leather, cloth, and certain other items. (A quick tip: do the eyes (if you want to do them at all) after the shade color and before the base color, so if you screw up you can fix it with the base color.)
For my orc's abdominal armor plates I used the NMM (Non-Metallic Metal) method, then cheated by drybrushing in a metallic paint. The NMM method consists of the normal three-tone technique, but sometimes slightly modified to use more colors. For instance, for bright silver metal, you'll use black folloewd by dark grey followed by light gray followed by really light gray followed by white. But for my orc's armor, since it's supposed to be tarnished and rough, I just used black, dark gray, and light gray, followed by a drybrush of metallic gray to give it a more weathered appearance.
The orc's sword was done using a similar method; I gave it a base coat of black, then drybrushed it in dark gray and finallly drybrushed it in metallic silver.
Washes and filters are also very useful, and I used them quite extensively. (BTW, a wash is very diluted paint that brings out shadows; a filter is less diluted paint that is meant to change the overall color of the surface area). You have to kind of use your discretion for these; for instance, for the orc's leather arm thingies I applied a filter of dark brown over the base coat, then highlighted in light brown. One note: for my washes and filters I use Liquitex Matte varnish/thinner as a thinner instead of water; water washes leave dirty-looking rings in the wrong places and doesn't cover as well. My Liquitex works much better, covering evenly and smoothly.
As for basing, I used a 30mm base for the dwarf and a 40mm base for the orc.
So all this might sound time consuming and tedious, but it's actually quicker then you might think. Each of these figures only took me only about two painting sessions.


Friday, May 29, 2015
Some More Crusaders
I finished two more batches of Italeri Crusaders for Lion Rampant.
Anyway, I experimented with some new techniques on these guys, including the Foundry 3-layer paint system. In this system (a deeper summary can be found here.) This paint system is actually designed for 28mm, but can be used occasionally with 1/72 figures, on areas such as a tunic, cape, or caparisons (horse blanket thingies.) Anyway, I was experimenting with it a little bit because I'm going to try my hand at some Reaper 28mm Fantasy minis soon, and want to practice a little first.
The figure in the first photo below is an example of the Foundry technique. I painted this guy's cape red, washed it with a dark red glaze to darken the color, then painted the highlights in a reddish-pink. This is actually a two-layer job, not three, but that's because I wanted the highlights to be pronounced so you could see them from a distance.


 |
| The lot of 'em |


Subscribe to:
Posts (Atom)